We are here to guide you on the true essentials for backpacking gear. We remember how much help we needed when we were getting started. And we want to help you. Here we will talk about tips on what gear to bring, the best supplies to have and an essential equipment packing list for overnight hiking,
And you are in a great position here. You get to learn from our experiences, and our mistakes, before you make the trek out into the backcountry yourself.
Let’s start at the very beginning, a very good place to start. Pack and gear weight.
Our number one concern on our first thru hike as beginners was packing as lightweight as possible. We really got into the idea of minimalist packing – and I was obsessed. Want to know how obsessed? My pack only weighed 21 lbs. To give you a basis for comparison, the packs we saw on the trail averaged about 50 lbs and ranged up to 65 lbs! That amount of weight is not recommended for most people.
In fact, experienced hikers and backpacking gear weight calculators suggest a man should carry no more than ⅓ of his weight and a woman should carry no more than ¼ of her weight. And the further away you get from that maximum weight the better. Even 5 or 10 extra pounds will make a huge difference.
A lighter pack will reduce your risk for injury, conserve more energy and just make you more willing to push yourself every day. Check out our post ‘Physical Training for Backpacking and
Having trouble packing light? Here’s a great tip! Take all of the items you plan to bring and split them up into two piles – the first pile will be your absolute necessities (shelter, food, water system etc). The second pile will be everything else (things you “want” to bring, luxury items etc). Now, weigh the second pile to get an idea of how much extra weight you will be carrying around every day. Take a moment to realize you are carrying that weight around for things you do not need. You now have a better idea of how much you can cut out.
Tip #2 – Fill your pack and take a long hike with it on. If you don’t know what the weight feels like on your back before you start your trip, you are just asking for trouble.
As for that first pile, “your necessities”, you’ll want these items to be as lightweight as possible. The heaviest items you will be carrying are the pack itself, your tent and your sleeping bag. Try to find lightweight options that still provide the quality you need. This usually comes with a hefty price tag but we were able to find some great budget options (check out the links throughout this post).
We’re curious, how do you keep your pack weight down? Do you eliminate all luxury items? Do you try to find the
Your Packing List Guide for Gear, Supplies and Equipment Essentials on a Thru Hike Backpacking Trip
If you are going to be hiking The West Coast Trail in British Columbia, Canada, make sure to read our post ‘Eleven Tips for Hiking the West Coast Trail’ for everything you need to know.
Hiking Gear Essentials List for Women
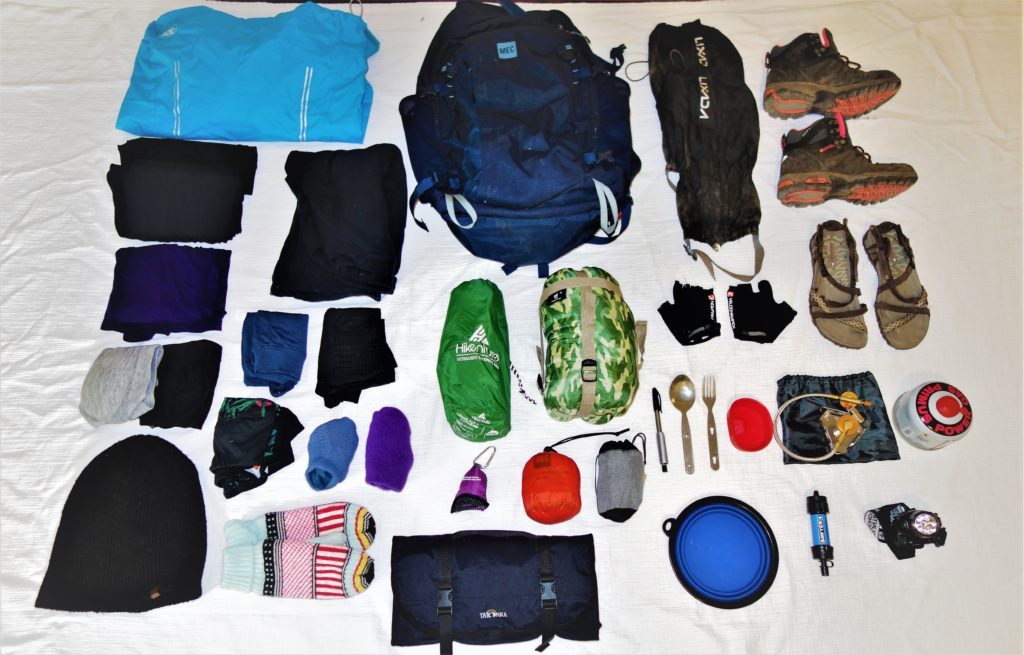
Reliable and Waterproof Hiking Boots for Women
Mountain Warehouse Summit Women’s Boots Purchased from Amazon. Waterproof and lightweight.
I did not spend big money on my boots. That made me a little nervous since every review I read suggested boots in the $300-$400 range. I made sure to break these bad boys in really well before I got on the trail. Luckily, I never once had a problem with these boots. They are super comfortable and almost feel like you’re wearing a normal shoe rather than a hiking boot. I never had a blister. I never got wet feet. They are durable and held up against all terrain. A great purchase.
*Sidenote: I have been reading about swapping out hiking boots for trail runners. I did see some people on the West Coast Trail wearing trail runners. The advantages would be a lighter weight shoe, a more comfortable feel and more ability to be agile. This seems like an interesting swap that I think I will try out. Although, I would not suggest trail runners for anyone with ankle issues as they do not offer the support you need.
Lightweight 45L Backpack for Women
MEC Flair 45 Backpack – Women’s. Purchased at MEC.
I originally bought this pack to backpack through Europe but it served both purposes very well. A 45L pack is generally not recommended for a seven day hike, however, my obsession with lightweight products and my lack of luxury items allowed for a smaller pack. I love this pack because it contours your body well so it feels very natural to wear. It has plenty of pockets, sections and straps for all of your extra items – my favourite being the two pockets on the hip straps for easily accessible items.
The Best Lightweight and Budget Sleeping Bag
Geertop Lightweight Compact Mummy Sleeping Bag. Purchased from Amazon. Weight: 790g (27.8 oz). Temperature range 32F to 59F / 0C to 15C.
This sleeping bag was a bit of a risk since I had never heard of the brand and there were very little reviews online. But as usual, the budget price tempted me enough to order it. The bag turned out to be perfect for all of our backpacking trips. It was warm enough for the cool nights (at night the temperature went down to 10 degrees C) and the mummy style really helped to keep you warm from head to toe. When the bag is compressed it gets super small and takes up very little room in your pack. It is also extremely lightweight and waterproof. Everything we needed.
If budget sleeping bags are right up your alley, see our complete list in our post ’10 of the Best Cheap Sleeping Bags for Camping and Hiking’.
Lightweight and Compact Sleeping Pad
Outdoorsman Lab Ultralight Sleeping Pad. Purchased from Amazon. Weight: 480g and folds to the size of a water bottle.
We spent a little more than we wanted on this but we were determined to get a sleeping that folded down to a small size. Overall, the pad is pretty good. It fills up with only 10-15 breaths and deflates very quickly. It is fairly comfortable but I would have liked something a little wider and thicker. Both Andy’s and my sleeping pads sprung a leak during the hike. Luckily the pads come with a repair kit that worked perfectly and held for the remainder of the trip. Andy found the pad comfortable enough, however, I think I will invest in something a little heavier which will offer a bit more padding.
Compact and Inflatable Pillow
Trekology Camping Pillow. Purchased on Amazon. Weight: 2.75oz (78g) and folds down smaller than a can of soda.
This is definitely the purchase I am most excited about. A pillow could be considered a luxury item but we deemed it a necessity after many sleepless nights during our backpacking training. These pillows took up almost no room or weight in our packs so I would recommend them to anyone. They make your sleep so much more comfortable and sleep is the most important thing in order to rest, recover and continue on the next day.
Hiking and Trekking Poles are a Safety Necessity
There is huge controversy here in the backpacking world. Some people love them and some people argue that they are not necessary.
I was very stubborn and decided not to bring any as I thought they would not be needed often enough and would get in the way. Well, guess who ended up with extreme knee pain on day three?? I am convinced if I had used hiking poles from day one that I could have avoided that level of pain.
My uncle ended up leaving the trail halfway through so I was lucky enough to snag up his poles and used them every step I took for the remainder of the hike.
These saved my life! The thing with the West Coast Trail is that the path has never ending ups and downs and with up to 50 lbs on your back, your hips, knees and ankles take a beating. Being able to control your ascent and descent with the poles and take some weight and shock off your joints is necessary on this trail. The only time they get in the way is when you are climbing ladders but it was easy enough to strap them onto my wrist in order to climb hands free.
Women’s Clothing Checklist Tips
All of my clothing was kept in a dry sac. I went minimalist with this and brought a very small amount of clothing for the hike. You don’t need much in the way of clothing and it’s a great way to free up space in your pack for more essential backpacking gear. I basically had one set of clothes for hiking and one set for camping, as well as rain gear to keep me warm and dry.
This is what I typically pack for a 7-day thru hike:
- 2 tank tops
- 2 pants
- 1 pair of shorts
- 1 fleece
- 1 thermal long sleeve top
- 2 merino wool socks
- 2 sports bras
- 7 underwear
- 1 raincoat
- 1 toque
- 1 pair of warm mittens
All of my clothing was made of synthetic materials (mostly polyester and nylon, but some merino wool) to ensure lightweight and quick drying clothes. Avoid cotton – it is heavy, bulky and will stay damp the whole week. I had more than enough clothes for the trip and I wouldn’t change a thing about what I brought.
Water Filter and Water Bottle
Sawyer Products Water Filtration System. Purchased a 2-pack from Amazon.
We were very happy with this product! Along the trail, we saw many different types of filters and we thought ours was the best choice.
First off, a water filtration system far outperforms water tablets. Filters are instant and leave no weird flavour behind. You get quick, clean and delicious water.
Second, compared to other filters it seemed ours poured out at a faster rate. I saw many people struggling to drink water from their filters because they filtered so slowly. Trust me, after hiking km after km in the August sun you need fast and reliable water.
Third, our filters were small, lightweight and attached directly onto the outside of our water bottles. We saw many water filters that went inside the water bottle which takes up precious room that could potentially hold more water. And other types of filters required you to pump your water from the filter into your bottle which is time consuming and awkward.
Our little Sawyer Filter worked perfectly. We filled up our bottles with any fresh water we could find (even some sketchy, non-flowing water at times), attached our filters onto the mouth of the bottle and were drinking clean water in seconds (and never got sick in the slightest). And the cherry on top – this system was much cheaper than any other system I could find.
Ultralight Cooking Stove Gas Burner
BRS Camping Gas Cooking Stove purchased on Amazon. It’s super small and lightweight (only 25g!) and also packs a huge punch and heats food up fast. You do not need anything more complicated than this.
Butane Cooking Gas
Jetboil Jetpower Fuel Blend. These beauties attach right onto your burner and one canister has a very long life. We were getting about six meals out of one 230g canister. Since we were not cooking lunches, we only needed about 3 canisters for a whole week of cooking.
Lightweight Cooking Pot
TOAKS Titanium 750ml Pot purchased from Amazon.
This 750 ml pot will be enough to cook for 2-3 people. The pot only weighs 3.6 oz and you can save space by filling the pot with other pieces of gear like your burner.
Longlasting LED Headlamp
Headlamp Elmchee Rechargeable Headlamp. Purchased from Amazon.
If you have never used a headlamp before you need to start now – they are a camping game-changer! They shine just as bright and far as a handheld flashlight and the battery will last longer. They also take up much less room than a flashlight. And the best part is that you are hands-free and the light will shine wherever you are looking. I love these things and I can’t believe I camped my whole life without one.
First Aid Kit and Safety Items
Medication (Advil, Aleve, Muscle Relaxer, Antihistamine, Gravol), blister pads, athlete’s tape, bandaids, Polysporin, Hydrocortisone cream, Voltaren.
*A note on Gravol: I brought this along in case someone got sick or nauseous. Luckily we didn’t need it for that. However, one night I was having trouble sleeping and Andy suggested I take one. It put me out right away. From then on Andy and I split a gravol right before bed and it helped to get us to sleep quickly and stay asleep all night. This is not something I would do regularly but on this hike we needed to make sure we got our rest.
Other Necessities and Basics for Safety, Survival and Comfort
Collapsible silicone bowl – Used for all meals from breakfast to dinner. No plate was necessary.
Collapsible silicone mug – For coffee and of course, whiskey. No need for a full sized metal mug (heavy much?).
Lightweight fork and spoon
Cycling gloves – To keep our hands baby soft while climbing ladders and walking with hiking poles all day. We decided to go with a cycling glove because they have built in padding and keep your fingers open for airflow.
Gaiters – The trail isn’t too bad for mud in August (although it is bad at some points). Gaiters are 100% necessary for the mud anytime before or after August. I am glad I had them however, because they helped to protect my legs from branches, thorns and bug bites, and they also helped to keep dirt, sand and mud from getting into the tops of my boots. I wore them daily.
Camping shoes that can act as water shoes– Once you’re at camp you will want to get your hiking boots off ASAP. Bring along a lightweight set of camp shoes that could double as water shoes. You will want something with airflow that can dry easily. I brought some sandals with sturdy straps on them. A cheap pair of crocs would do it too.
Small microfiber towel – This was easy enough to bring along as it took up almost no space or weight. These towels absorb water very well but also dry very quickly. Do not bring along a full sized or cotton towel. This will add bulk and weight to your pack and you will be carrying around a damp towel your entire trip.
Duct Tape – I wrapped a bunch around a pencil in order to save space. We used this to help prevent blisters but it really has a million uses on a trip like this.
Waterproof pack cover – An essential piece of rain gear. Some packs come with this built into the bag but I had to bring my own. You want this – even if it doesn’t rain on your trip, mornings can be very foggy and dewy and you will want to protect everything in your pack. Wet = bad!
A large Ziplock bag – This is a “leave no trace” pack in, pack out trail. Which means there are no garbage cans along the way and you have to pack out any garbage you make. A large ziploc bag is a nice, neat way to keep your garbage separate from the rest of your items.
Toiletry bag – I found a great bag at an army outlet store that hangs from the ceiling of your tent. It also had an attached mirror in case you’re curious how horrible and dirty you look. I packed cleansing cloths, face lotion, a few pieces of makeup, travel sized sunscreen, bug spray, deodorant, toothpaste and toothbrushes, hand sanitizer, a small piece of natural soap, toilet paper and a small comb.
Cash – $200 for Andy and I. We used this for the
Visit our Travel Resources page for a carefully curated list of the best outdoor gear, travel gadgets, and helpful travel apps.
Hiking Gear Essentials List for Men
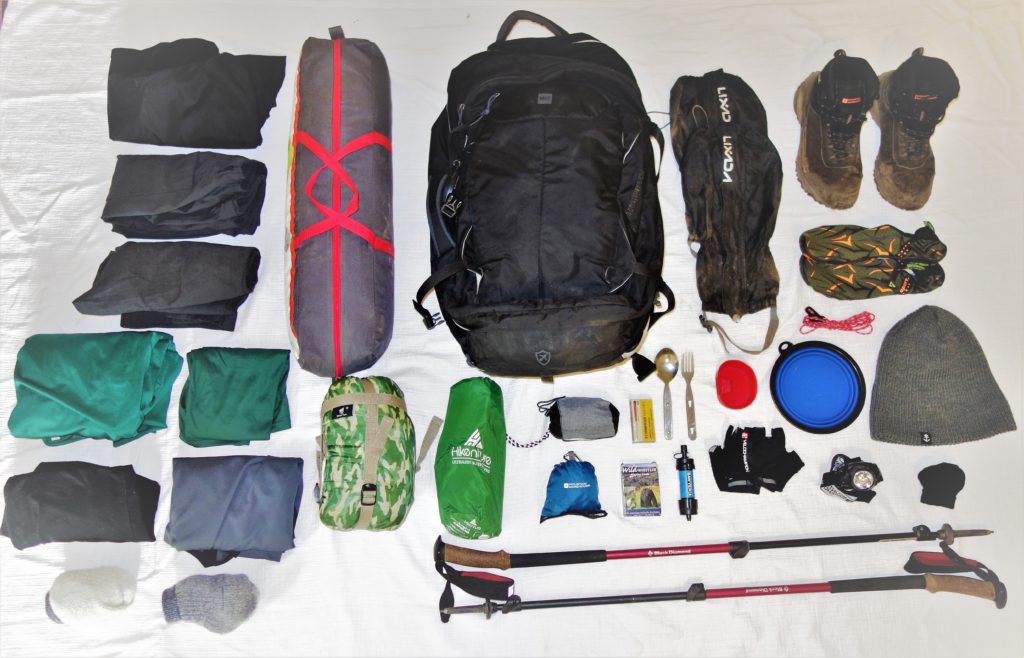
Men’s Waterproof Hiking Boots
Mountain Warehouse Boulder Men’s Waterproof Trekker Boots – Purchased from Amazon.
Andy lucked out too. These budget boots were comfortable and durable. They remained waterproof the whole trip and gave him zero blisters.
Men’s Durable 65L Backpack
MEC Forge 65 Backpack – Men’s. Purchased at MEC. 65L was the perfect size and this budget bag has everything you need.
Ultralight and Compact Tent
Outbound Dome Tent, 3-Person (Note: this is definitely just a 2-person tent). Purchased at Canadian Tire. Weight: 5 lbs 12 oz/2.61 kg.
This tent was a few pounds heavier than what we wanted but for the price we couldn’t resist. We were very happy with the tent. It had room for two adults and our packs. It was durable and warm enough for the cool West Coast Trail nights. Everything seemed to stay pretty dry. This was a great purchase and we will continue to use this tent for our backpacking trips.
Sleeping bag, sleeping pad, pillow, water filter, headlamp, cycling gloves, gaiters, towel
All the same products as listed in the women’s backpacking gear section.
Trekking and Hiking Poles
BAFX Products Trekking Trail Poles. Purchased on Amazon.
Hiking poles are vital in surviving advanced level multi day thru hikes. Just make sure you have poles, of any kind, in order to complete the hike with knees that still work. We love the BAFX poles because they are lightweight, durable, collapsible and a good price.
Lightweight Backpacking Food Ideas
We had a great set up for the food situation because we travelled with a group of 6. Since we had 6 nights at camp, we decided that each person would take care of one dinner each. This way each person only had to pack one large dinner, along with their own breakfasts and snacks.
If you are traveling in a large group this might be something to consider. It decreased our weight significantly.
For breakfast we decided to only pack instant oatmeal. We chose this because it is light, easy to cook and very filling. Luckily we didn’t get sick of oatmeal after a week of it.
We also decided to pack no lunches. During our training we noticed we were not hungry throughout the day. It may seem strange to not be hungry when you are burning so many calories but it is a common occurrence among backpackers. Instead of bringing meals for lunches and wasting precious space in our packs, we just brought mixed nuts and beef jerky. It was the perfect amount of food and we did not feel deprived at all.
From what I have read online and from what I saw on the trail, people tend to pack way too much food. It is so important to accurately calculate how much you will need because food is one of the heaviest things in your pack.
You will not need as much food as you think. Keep it simple and try not to get too fancy. It’s only a week, you can eat like a king when you get home.
For a more in depth look at food ideas for hikes, check out our post ‘Healthy Food Ideas for Snacks and Meals While Hiking‘. Our food guide reviews the best high energy food and meals for day hikes, as well as overnight, multi-day backpacking trips.
Men’s Clothing Checklist
Here is Andy’s typical clothing backpacking gear list for a 7-day
- 2 pairs of hiking pants (1 pair had zip off bottoms that turned into shorts which he ended up wearing the whole time. He ended up not needing the other pair)
- 1 pair of thinsulate long johns to wear at camp – they kept him nice and warm.
- 1 fast dry t-shirt
- 1 fast dry full sleeve shirt
- 1 rain coat
- 1 nylon zip up sweater
- 1 pair of gloves
- 1 warm toque
- 2 pairs of merino wool socks
- 7 pairs of boxers
Water Shoes – Andy brought true water shoes, which he only used once. He regrets having brought them, and wishes he had just brought sandals. The main reason water shoes were the wrong decision is that once they got wet they would not dry out and had no air flow. Therefore, he ended up walking around bare foot at camp (which actually felt good as the sand soothed his feet). Instead, he wishes he had some cheap flip flops to slide on.
15 meters (50 ft) of synthetic rope – To hang your food bag in case the bear bins are full and to make a clothesline to dry out your clothes.
Storm proof matches
Small pocket knife
Camera – We decided not to take our nice, expensive camera with us. We took along an older digital camera which we wouldn’t have minded if it got damaged. A digital camera is a great option for this trail. You’ll get decent pictures and the battery is likely to last the week.
Playing cards – We brought these along to ensure I could kick Andy’s ass at Gin.
Beginner Mistakes and What Things we Wish we Brought
A book – There is a lot of downtime on these types of hikes. The downtime is needed in order to rest your body but we wish we had a little more entertainment at times. A book would have been the perfect distraction.
Hot chocolate – This is a common food item on
A thicker sleeping pad – I saw some people with gorgeously thick sleeping pads and I was extremely jealous. As I mentioned before, comfortable sleeping is so important in order to rest and recover each day. I would happily have carried a little bit more weight in order to have a more comfortable sleep. Something like the ENKEEO Inflated Sleeping Pad appears to be more my speed. I may just order it right now.
Burner and cook set in one – If I were hiking solo I would definitely switch to something like the Optimus Crux Lite Cook System which is super compact and allows you to cook and eat out of the same container so you don’t need to bring a bowl and cup. I saw a lot of people cooking with these on the trail and thought it was ingenious.
Repair kits – We had duct tape and repair kits for our sleeping pads but not much else. What we really wish we’d brought was extra bag straps and clips. This is something we never even considered prior to the trip.
Unfortunately, Andy’s hip strap broke on the third day in. The clip completely shattered when he was tightening the belt. This was devastating as he now had 40 lbs sitting directly on his shoulders for the rest of the day. Once we got to camp we were able to construct a makeshift clip with some extra carabiners but it would have been brilliant if we had brought along some extra straps and clips for repairs along the way.
Prepare yourself properly by considering what could go wrong and bring along what you might need to fix it.
Paper to start fires – The West Coast Trail tends to stay a bit wet and damp the whole year and we found it difficult to start a fire because all the kindling and driftwood was a bit soggy. We ended up using paper from a book my dad was reading to help start the fires. In hindsight, we should have had some newspapers or pieces of cardboard which wouldn’t have added too much bulk to our packs.
A wrist watch – Knowing the time is important in order to plan your day out around the tide schedule. It is also handy in order to figure out how many kms/hour you are travelling to help you plan out your next day. We did not have a watch and were constantly bugging people for the time.
Earplugs – To allow for a restful nights sleep (especially on “farting beach” where sea lions are barking all night long).
Hiking poles – I’ll say it again, bring them along! Do it! Do it!
Things you do not Need to Pack
Cellphone – Don’t bother bringing your phone. There is no cell service on the West Coast Trail and there’s no chance your battery will make it a week. Plus with the wet weather and extreme difficulty of the trail, your phone is likely to get damaged.
Satellite phone – There are many ways to contact someone in case of emergency – lighthouse keepers, First Nation trail guardians, ferry operators and Parks Canada staff are present along the trail for your safety.
GPS – You will be provided with a trail map which is extremely detailed and the trail is very well marked along the way so you are unlucky to get lost. And if you do get lost, it is not hard to find your way back to the path.
Weather radio – Really? You cannot control the weather and don’t have much of a choice but to hike through rain storms if that is your fate.
Chair – This is definitely a luxury item and is not needed on this trail. The campsites are situated on beaches with limitless amounts of logs to use as a chair. Also, make use of your sleeping pad for some cushioning to sit on outside. Save the space and leave the chair at home.
Axe or saw – These are heavy and bulky and never necessary. Every campsite has driftwood you can burn for your fires. Some sites have more wood than others but you can always gather up enough for your fire.
Multi-tool/Large Swiss Army knife – These are very heavy! All you need is a small, lightweight knife.
Canned food – I cannot believe how many people I saw carrying around canned foods. Canned foods, and really any food that contains liquid or sauces, adds so much weight to your pack. Plus, you’ll have to carry a can opener too! Spend the time to dehydrate your own food (you can do this in your oven) or buy dehydrated and freeze dried foods.
Coffee Maker – Even the highest of coffee connoisseurs can suck it up and drink instant coffee for a week.
Frying pan – What exactly are you needing to fry up on this hike??
Hammock – I saw people with hammocks, not for sleeping in, just for chilling in…. I don’t know…. it looked cool AF but I think we can all agree this is a pretty elaborate luxury item. And since all campsites are on a beach, there are very few trees to set them up.
Beer/Wine – This should be obvious. Although we came across people carrying multiple bottles of wine (cringe). If you want a little late-night glow, bring along some 13 oz plastic bottles of rum or whiskey. We chose Fireball Whiskey because it’s great to sip on and you don’t need a chaser or mix with it.
That’s it, that’s all! Your fate is now in your hands. I will say one last thing – if you have never backpacked before, please heed our warnings! It is very easy to be naive to the struggles and dangers of a hike like this. It is very easy to shrug off advice from others. However, until you actually do a thru hike yourself, you will not have an understanding of what is important and what is not. Take the advice you get and run with it! You will thank us in the end.
What is on your list of backpacking gear essentials? Let us know in the comments below!
Do you love this post? Share it on Pinterest:
*This post may contain affiliate links that help to keep this blog running. Read our disclosure for more information.

51 comments
Nice list. What you’ll pack depends of the season and your preference. I prefer traveling light so I’ll cut a few items
Definitely depends in the season, trip and preferences!
[…] ‘The Essential Backpacking Packing List’ […]
A very well written article. Thanks for the tips that really never crossed my mind. I found it so hard to leave ” those must have items.” I like your ideal of making 2 piles. It made me see that I didn’t need the must have items. Keep on writing your are a natural at it.
So kind of you! I am glad that tip helped you 🙂
[…] ‘The Essential Backpacking Packing List’ […]
online finance dissertation help https://buydissertationhelp.com/
nms exocraft slots https://www-slotmachines.com/
dgn free slots https://411slotmachine.com/
scorchy slots guide https://download-slot-machines.com/
slots lv https://beat-slot-machines.com/
vagas slots https://slot-machine-sale.com/
myvegas slots free chips https://slotmachinesforum.net/
slots winning video 2022 https://slotmachinesworld.com/
super high limit slots https://pennyslotmachines.org/
real casino free slots https://candylandslotmachine.com/
free giants gold slots https://freeonlneslotmachine.com/
armor slots https://2-free-slots.com/
gay chat free no cost https://gay-buddies.com/
free live gay web cam chat roos https://gaytgpost.com/
does pof allow for gay dating https://gaypridee.com/
gay webcam chat sites https://bjsgaychatroom.info/
2editorials
Well written, thoughtful post. However, one of the most important items you missed is a first aid kit. It’s a critical piece of equipment both for yourself as well as other hikers you may come into contact with on the trail. We take a small first aid kit even on day hikes. Also, a small Bic type lighter (we wrap duct tape around that instead of a pencil) is much more efficient at starting a fire than matches and will eliminate the need to pack paper to use as tinder. Enjoyed reading this!
Thanks for the comment Cindy! We definitely know the importance of a first aid kit (we actually listed it in this post with the medications we take along with us – we always need advil!). Great idea with the lighter trick! I think we’ll try that next time 👌
[…] ‘The Essential Backpacking Packing List’ […]
[…] ‘The Essential Backpacking Packing List’ […]
You are backpackers after my own hart. Sun stuff. Bandanna, TP and trowel, char cloth, might be some lightweight extras to add to your list.Great post.
Great additions! Happy backpacking 😆😆😆
[…] ‘The Essential Backpacking Packing List’ […]
[…] ‘The Essential Backpacking Packing List’ […]
[…] ‘The Essential Backpacking Packing List’ […]
[…] ‘The Essential Backpacking Packing List’ […]
[…] ‘The Essential Backpacking Packing List’ […]
[…] ‘The Essential Backpacking Packing List’ […]
Thank you very much for the list of equipment required for trek.
It really helpful to pack before hiking and trekking adventures.
You’re so welcome! So happy to help people prepare for hikes.. hoping to make it easier and safer for everyone 🙂
[…] ‘The Essential Backpacking Packing List’ […]
[…] Backpacking Essentials: What to Bring and What Not To […]
[…] thorough post on lightweight (and budget!) camping and backpacking gear – check out ‘Backpacking Essentials: What to Bring and What Not To’ to learn […]
[…] This post outlines the gear you will need on a more traditional camping trip where you are afforded a few luxuries like being able to drive in to your site and having access to water and a bathroom (For a complete list of what to pack on a backcountry camping hike with a focus on lightweight and budget gear, check out our post ‘Backpacking Essentials: What to Bring and What Not To‘). […]
[…] Make sure to keep your pack as light as possible. The lighter the pack, the less risk for fatigue and injury. To learn more about lightweight packing, read out post ‘Backpacking Essentials: What to Bring and What Not To’. […]
This is an impressively thorough post. I’m not planning any hiking trips anytime soon, but this info is interesting and at least potentially useful. I like that you bought less expensive items and found them adequate. (Yay, Canadian Tire!)
Thank you for the kind words! Yup… we are all about budget options. We definitely lucked out in this case. So glad you enjoyed the post… I hope it helps if you ever go backpacking one day 🙂
Sound stuff… very informative although late for me as I did the trail north to south in June…. I think your words are on point…… hope to see more posts
Hey! Thanks for coming over from Facebook 😃 I hear yah.. I hope to get to people before they do the trail.. I would have loved these tips before I started the hike!
[…] will be our third and final post about the West Coast Trail. Check out our other posts Backpacking Essentials: What to Bring and What Not To and Physical Training for Backpacking and Thru Hikes for tons more information on this […]
Finally got around to reading this. MJ & A this post is amazing! Invaluable! I’m going to share it with the Bruce Trail. You’re advice is spot on and although I’ve never done over night hiking, everything I’ve read in the past is the same as what you’ve said and more. I sure hope you are having as much fun writing this blog as I am reading it. How refreshing to read interesting and thought provoking posts on fb.
I started using 2 poles (have always used just one since 2011) 4 weeks ago. What a difference as you said regarding knees hips everything including balance and no more sausage fingers. BTW I made my own gators from windbreaker nylon, they roll up into a tiny cigar. Thanks for the great read….waiting to hear more xxoo
A rave review! I am so glad you are enjoying reading the blog so far 🙂 Yup those poles are everything! Great idea about the gaiters I love it!!
Bravo! What a helpful post for anyone considering a backpacking adventure. Your experience will save others from poor decisions. It’s funny that your sleep mat was the only item that cost you more than you wanted to spend and turned out to be the least satisfactory piece of gear…besides Andy’s water shoes..hehe. Who knew the poles were so important?? I sure didn’t. Hot Chocolate would be lovely. Fireball whiskey was pretty good too. What a wonderful post. Very well done and I love the “Sound of Music” reference.
Oh you got the Sound of Music reference! 🙂 Love it…. thanks for the love xoxo 😉