
We successfully completed the West Coast Trail a few weeks ago. We will hold here for applause.
Being relatively new to these multi day backpacking hikes, we had some hiccups, but overall the trip was absolutely beautiful, spiritual and life changing. I definitely think every single Canadian should be required to complete this trail and it should be a top destination for anyone visiting Canada.
For more information on how to prepare for and pack for a long hike, thru hike or backpacking trip, check out our other posts ‘Backpacking Essentials: What to Bring and What Not To’ and ‘Physical Training for Backpacking and Thru Hikes’.
This post is a quick rundown of what we believe to be the most important tips for the trail and what we wish we had known before starting the hike. As always, feel free to comment below with any other questions you may have about the hike.
Your Travel Guide to Hiking the West Coast Trail on Vancouver Island, BC, Canada
Tip #1: Preparation is key. Training on overnight hikes will perfect your packing list and checklist
This tip is mostly for inexperienced backpackers. The West Coast Trail is long, hard and dangerous. If you have limited experience with overnight hikes you need to get a few under your belt before attempting this “Great Walk”. Multiple practice runs will ensure you have a much more successful and enjoyable trip on the West Coast Trail.
Firstly, practice hikes will give you an idea for how your pack feels and what the weight feels like. This will allow you to switch up your pack or decrease your weight if necessary.
Secondly, you can test out the quality of your gear. If you happen to be using old, borrowed or brand new gear, this will give you plenty of time to test out the performance of it all. During our practice runs, we realized we had to swap out our sleeping bags for warmer ones, we switched from water tablets to a water filter, and we purchased better quality hiking boots that offered more comfort and support. Looking back at the swaps we made, we realize how critical those changes were. Once you pack your gear and start on that trail you are stuck with what you brought. Testing out your gear in real life circumstances is essential prior to your trip.
Third, you realize which items you wish you had brought along. During our practice runs, we had an ongoing list of items we wish we had packed. We made sure to add these items to our pack before beginning the West Coast Trail. Our list included chapstick, hand sanitizer, baby powder (for chapped areas), playing cards, a toque/beanie and warm gloves, painkillers, Blister Pads
Note: We went back and forth on whether or not to bring trekking poles with us. Andy decided to, I decided not to. And guess what happened, Andy got through the trail with no injuries, and my knees gave out on Day 3. No one should attempt the West Coast Trail without trekking poles. You will need them with every step you take in order to take impact off of your lower body joints, allow your upper body to share the work, get you up and down hills easier, and they can even be used to check the deepness of puddles and to ward off predators. Something like the BAFX Trekking Trail Poles the perfect for multi day hiking because they are lightweight, collapsible (so you can easily pack them away when you don’t need them) and super durable so they will last you through many hiking trips.
The last piece we learned on our practice runs was that we did not need as much food as we thought. We packed meals for breakfast, lunch and dinner, as well as snacks. However, we found we did not get very hungry on our hikes. The combination of heat and exhaustion does not amount to hunger. We decided to carry smaller and more lightweight breakfasts (essentially just oatmeal), we cut out lunch completely and just brought trail mix and beef jerky, and we kept our dinners simple and dehydrated. Even with all these changes, we had more than enough food on the trail. What we saw along the trail was that people packed way too much food which made their packs overweight. A practice run will give you a good idea of how much food you really need.
Tip #2: Find the most lightweight equipment and gear as you can
We talk a lot about this in our post Backpacking Essentials. Spending time (and money) on this may be the one thing that gets you through this hike and with less risk of injury. As stated in a previous post, the recommended weight for men to carry is 1/3 of their weight, and for women it is 1/4 of their weight. These are the maximum numbers and every pound less than this max will improve your hike immensely. Lightweight products with good quality performance tend to be quite expensive. But if you take your time looking online and in surplus stores, you will find some good budget options. If nothing else, ensure you have a lightweight pack, tent, sleeping bag and make sure not to carry too much food.
Gear Matters! Pack with care. You want to ensure you have everything you need yet you do not want to overpack. Do your research, plan it out, take practice hikes. Check out our other backpacking posts for tips. In order to help more novice backpackers – we have come up with our Top 5 Must Have Backpacking Items to ensure preparedness, comfort and safety:
- BAFX Products Trekking Trail Poles – do not attempt an advanced trail without trekking poles. These things will save your joints from high impact which will keep you hiking longer, safer and happier.
- Elmchee Rechargeable Headlamp – flashlights are so last year.
- Geertop Lightweight Compact Mummy Sleeping Bag – our favourite budget sleeping bag

- Trekology Camping Pillow
- Sawyer Products Water Filtration System – lightweight and effective!
Tip #3: Advice on which campsites to sleep at
To keep things in numerical order, I’ll talk about the trail from 1 km to 75 km. However, if you are travelling from south to north, these stops may not make as much sense for you.
- Skip Michigan Creek (12 km) if you can and go for Darling River (14 km). Two reasons for this: It will take an extra 2 km off your next day, and Michigan Creek wasn’t much of a campsite with little to offer. If you are able to push it even further, try to get to Tsocowis Creek (17 km). This campsite is much more beautiful and comfortable than 12 km or 14 km, and also has beautiful falls to sleep beside.
- Most people will stop at Tsusiat Falls (25 km) because there are no other campsites from 30 km to 42 km. This is a stunning campsite with really cool driftwood set ups and more falls to gaze at (*Note – the falls are the only water source here, which means you have to get into the water and catch your water from under the falls. If you do not want to be submerged in glacier water, fill up before getting to this site). Because of the placement of this site, it is very popular and busy. My suggestion is to stay on the north side of falls where it is less busy, has it’s own bear bin and separate outhouse, is much closer to the water source, and has loads more driftwood.
- If you can make it and if you are willing to spend the money, there is luxury camping at 30 km. I say this mostly because of the long stretch where there are no campsites available (other than this luxury camping spot) from 25 km to 42 km. Camping at 30 km will shave off 5 km for your hike the next day. I think it is worth it. Hiking from 25 km to 42 km is a long day and if you can break it up a bit you will enjoy it much more. The luxury campsite offers cute and updated cabins with generators and they are located on a beautiful and secluded beach.
- Another way to break up that 25 km to 42 km stretch is by camping at Dare Beach (40 km). This is not an official campsite but it has lots of beach to use and its own fresh water source.
- Coal Creek (42km) is also called “farting beach” because it sits across from an island of sea lions who bark all night – a little difficult to get the rest you need. Just a heads up to any light sleepers out there. Earplugs would be very useful here.
- Walbran (53 km) is very lovely, very busy, has a nice spot to swim and lots of driftwood. However.. ⇨
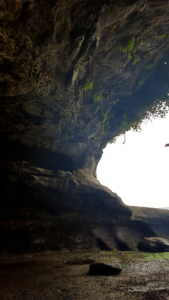
- Stay at Cullite Cove (58 km) if you can. It has very little campers due to the placement along the trail – you would either have to hike from Thrasher Cove (70 km) to Cullite which is a very long, very hard day, or you hike from Camper Bay (62 km) which makes it a very short day (about 2 hours) which some may see as a waste. Or if you are coming from the north you would be coming from Walbran (53 km) which would also make for a very short day. However, if you can figure out how to make it work, this is by far the most beautiful and secluded campsite of them all. This is the only site that is not directly on the beach and is set back into the woods a little bit with a quick path down to the ocean and to a fresh water source lovely for swimming in. It is in a cove and you are completely protected by huge rock walls. Because of the protection, this was the only night where the air stayed warm and everything remained dry.
Tip #4: Average time to complete the 75 km trail is 5 and 7 days. Your duration depends on your experience level.
If you are an inexperienced backpacker – plan on, and expect to take 7 days. We planned to take seven days for the trail and we ended up completing it in six days. But we ended up regretting this decision.
We decided to hike from Camper Bay (62 km) to the end. In hindsight, we should have broken this up and stopped at Thrasher Cove (70 km). The last 5 km of this hike are definitely the hardest and should be hiked over one day to ensure you are not rushing or injuring yourself. We pushed it too far and ended up very sad. Although it was nice to be in our beds a night early!
Taking seven days to complete the West Coast Trail ensures each day is broken up into easy to handle chunks, with appropriate downtime in order to rest and recover. You also get the time you need to enjoy the trip. It allows you time to take breaks and take lots of pictures.
This will probably be one of the most amazing trips you will complete in your life – my suggestion would be to take it slow and enjoy it!
Tip #5: Stop at the Crab Shack restaurant and Chez Monique’s for great food
We took full advantage of the two restaurants located along the trail. One good thing is that you can plan for these stops and pack in less food and less weight. You will also be dying for some tasty, hot food and a cold beer after a few days. You are also supporting the local people who are wonderful and have amazing stories to tell.
The Crab Shack was our favourite – located at 32 km at the Narrows ferry crossing . They serve fresh crab (literally taken out of the water as you order it), fresh fish with baked potato for about $35/meal. They also have snacks, beer and bottles of liquor ($30 for a 13oz). They only accept cash so make sure to bring lots.
The second stop is Chez Monique’s – located at ~45 km on the beach. They do serve breakfast, which we were hoping for, but they only serve it to the people who camp out on their beach. So the menu is essentially burgers and veggie burgers at about $20 – $25. They also have snacks, baked goods, wine, liquor bottles (cheaper here at $20 for a 13 oz). They accept cash and credit card.
Food is so important while hiking – we have to ensure we have enough (but not too much), that it is lightweight, non-perishable, energizing and tasty! If you are stumped for ideas, check out our post ‘Healthy Food Ideas for Snacks and Meals While Hiking‘. Our food guide reviews the best high energy food and meals for day hikes, as well as overnight, multi-day backpacking trips.
Tip #6: Information on best routes, itinerary and kms per day
- Make sure to walk the beach path for the first .5 km of the north side of the trail – if you take the forest you will be on ladders and hiking up and down elevation for no reason.
- In general, the beach path will be faster and easier, with less elevation changes, than the forest path. I cannot think of any areas where this is not true.
- Take the beach path from 65 km to 70 km – it is much more direct of a trail and the forest trail is quite difficult here. This beach stretch includes “boulder beach” which is exactly as it sounds. Boulder beach is extremely difficult so you need to take it slow. It stretches from about 67 km to 70 km and can take 2-3 hours to complete but it is beautiful and includes amazing caves and surge channels.
- As a general note – from 0-55 km you will be traveling at about 2-3 km/hr and after the 55 km mark you will slow down to about 1-2 km/hr. This is where the trail gets significantly more difficult due to quick and constant elevation changes, an increase in the amount of ladders, and very large tree roots to cross over. Make sure to plan your days out properly according to how fast you will be walking.

Tip #7: Getting there – tips on transportation, the WCT Express and bus schedules
First off, because the West Coast Trail is located on the endlessly beautiful Vancouver Island, you will need to take a ferry in from Vancouver, BC or Seattle, Washington; fly into Victoria, BC or Nanaimo, BC; or take a seaplane to Bamfield or Port Renfrew which are the two closest towns to each trail head.
Once you are on the island, you can either drive or take a bus to your trail head.
There are two options for a bus or shuttle:
1) The West Coast Trail Express provides shuttle bus service (May 1 to September 30) from Victoria and Nanaimo to the trail heads and between the trail heads of the West Coast Trail and the Juan de Fuca Trail. The West Coast Trail Express picks up and drops off passengers at Victoria, Sooke, Port Renfrew, Gordon River, Mesachie Lake, Honeymoon Bay, Nanaimo, Nitinat, Pachena Bay, and Bamfield. As of 2018, the cost is $90 to get from Pachena Bay to Gordon River (and vice versa), $55 to get from Victoria to Gordon River, and $125 to get from Nanaimo to Pachena Bay.
2) The West Coast Shuttle provides shuttle service (April 15th to October 15th) to the West Coast Trail, Juan de Fuca Trail, Cape Scott Trail and the North Coast Trail. As of 2018, the cost is $70 to get from Pachena Bay to Gordon River (and vice versa), $40 to get from Victoria to Gordon River, and $70 to get from Naniamo to Gordon River.
*Both services have a very limited schedule and you must make a reservation beforehand.
Driving directions:
Driving from Nanaimo to Pachena Bay via BC-19 S will take you about 3 hours. Driving from Victoria to Gordon River via Juan De Fuca Hwy/BC-14 W will take about 2 hours. Enter this on Google Maps before you leave. You will lose your cell service on the drive but Google Maps will continue to work as long as the trip was loaded beforehand. Both routes will take you on some rough roads. If you do not have a dependable car, do not attempt to drive yourself.
There is weekly parking available at both trail heads. There was a $5/day fee at Gordon River. It appeared there was no parking fee at Pachena Bay.
Are you interested in traveling more but have no money to do it? No worries! Just check out our posts on budget travel here:
- ‘How to Travel the World for Free’
- ‘How to Find Budget Accommodation and Lodging Anywhere in the World’
- ‘Things to do for Free While Traveling’
- ‘How to Maintain Your Food Budget While Traveling’
Tip #8: Where to start & orientation – Entrances at Bamfield (Pachena Bay) or Port Renfrew (Gordon River)
I suggest staying overnight at your trail head in order to settle in and to get your orientation finished the day before your hike so you can wake up and start your hike as early as possible. Orientation is mandatory, is about 1/2 hour long and occurs twice daily – at 10 am and at 2 pm. Which means, if you get to your trail head the same day you are starting your hike, you can’t begin until at least 10:30 am. This cuts into a long hiking day if you are travelling North to South, and a very difficult hiking day if you are travelling South to North.
Staying overnight at Pachena Bay (North trail head): Bamfield is the closest town (about 5 km away) and offers multiple hotels to stay in, as well as restaurants. Or even better, and cheaper, Pachena Bay Campground offers full service camping with hot showers and a snack shop. Pachena Bay is a beautiful beach that you will want to wonder along for a few hours.
Staying overnight at Gordon River (South trail head): Port Renfrew is the closest town (also about 5 km away) and offers hotels and restaurants. Pacheedaht Campground is located right at the start of the trail head and right where you will take your orientation. There are also hot showers here, as well as a snack shop with a small restaurant menu, and amazing fry bread! This is located in a very popular fishing area with a beautiful view of Port San Juan.
Tip #9: Reservations and booking must be done in January
It is very important to plan ahead for this trip and book in January when the reservations open. As of 2018, standby spaces are no longer available. This means if you want to get on the trail you have to reserve a spot. These spots fill up very quickly once reservations open. So don’t procrastinate!
Tip #10: Which direction is best – North to South vs. South to North
There is so much discussion around this. We walked North to South for no real reason. We were rushed into the decision during the booking process and booked it without really knowing the difference.
The general idea is this – the south end is MUCH more difficult than the north end. So your decision will be: whether you want to tackle the hardest part right away when you are fresh and uninjured, but when you will be carrying the most amount of weight in your pack and therefore will be expending much more energy to get through it; OR you want to hike the easiest part of the trail while you have your heaviest pack and hike the hardest part when you are lighter, but you may potentially have much less energy or may have an injury.
Personally, I was happy we chose North to South and that is mostly due to my lack of experience with thru hikes. We found that the first three days were exhausting and painful but as we walked on we felt stronger and more energetic to keep pushing on. In the beginning, the idea of walking 6 hours a day was shocking but halfway through we gave it no thought at all. Also, most people decrease their pack weight by about 10-15 lbs during the hike due to supplies being used up (food, fuel etc). This made tackling the most difficult areas much easier for us.
If you are not very experienced, I would suggest taking the trail from North to South. If you are a strong and experienced backpacker, going South to North would be appropriate.
Tip #11: Talk to everyone you see
You will come across wonderfully diverse groups of people along this trail. Everyone has a different level of backpacking experience and you learn just as much from someone inexperienced as someone with lots of experience. While passing people hiking in the opposite direction, they will have invaluable advice and great tips for what’s coming up ahead of you. People come from all around the world for this hike and you will meet wonderful people, make new friends and have plenty of entertainment.
I hope these eleven tips will help with your preparation for the hike. The most important thing is that you research, plan and prepare as much as possible before starting your trip. Have fun, be safe and enjoy!!!
Have you hiked The West Coast Trail? What tips do you have for everyone? Comment Below!
Do you love our tips for the West Coast Trail? Share it on Pinterest!


*This post may contain affiliate links that help to keep this blog running. Read our disclosure for more information.
31 comments
play slots for free https://www-slotmachines.com/
free slots win real money https://411slotmachine.com/
my vegas slots cheat tool https://download-slot-machines.com/
egg poacher – 3 slots https://beat-slot-machines.com/
slots of vegas casino https://slot-machine-sale.com/
triple seven slots free https://slotmachinesforum.net/
play slots for free https://slotmachinesworld.com/
lobstr fest 11 slots https://pennyslotmachines.org/
myvegas slots on facebook https://candylandslotmachine.com/
division mod slots https://freeonlneslotmachine.com/
gossip slots https://2-free-slots.com/
gay dating sites for kids 10-14 https://speedgaydate.com/
phone chat in maryland gay https://gay-buddies.com/
little gay boys who want to sex chat with men https://gaytgpost.com/
adam for adam gay dating site https://gaypridee.com/
gay senior chat https://bjsgaychatroom.info/
3leathery
Great post, thanks for the tips! We’re going to hike this in September from North to South starting from Pachena Bay Campground. Do you know if there is a place to get a meal while at Pachena Bay? We arrive from Victoria by shuttle express the day before our trek starts and plan to do our orientation that day but cant seem to find any info about food. Any tips would be much appreciated.
Hey Stevo! That’s the same route we did and camped at Pachena Bay campground the first night. The camp has a little store with chips, chocolate bars etc. Bamfield is really close and has a few restaurants to choose from. There is a shuttle that will take you from Pachena Bay to Bamfield if you don’t have a car.
[…] Everything you Need to Know About Hiking the West Coast Trail […]
I would bring a second pair of boot insoles to allow 1 pair to dry while wearing the other pair
Great idea!!! Wet feet really bring a damper to things. I went in August so we were lucky to have no rain and little mud and our feet stayed dry the whole time 🙂
[…] ‘Ultimate Guide to Hiking The West Coast Trail’ […]
[…] ‘Ultimate Guide to Hiking The West Coast Trail’ […]
[…] – a multi-day backpacking hike on the wild west coast of the island. Read our post “Eleven Tips for Hiking The West Coast Trail” to learn […]
[…] you are going to be hiking The West Coast Trail, make sure to read our port ‘Eleven Tips for Hiking the West Coast Trail’ for everything you need to […]
[…] trips and thru hikes. If you are going to be hiking The West Coast Trail, check out our post ‘Eleven Tips for Hiking The West Coast Trail’ for everything you need to […]
Very useful! I’m definitely stashing these tips away until next summer’s packing season…
So glad you found it helpful! That’s why I wrote it 🙂
Bravo Meagan and Andy! Great detailed post with so much valuable information. You will save someone so many headaches if they take your wise advice. I was a bit shocked by the price of those meals but it was probably so worth every cent. Fresh crab..mmmm…so yummy! I think camping on “farting beach” would be quite the experience. I remember you guys were so happy to get home to your beds one day early but totally agree with your thoughts…what’s the rush? It’s all about enjoyment and taking time to soak it all in. Super post. Everyone should complete at least part of the West Coast trail in their lifetime. Oh Canada!
I hope it helps some people a little bit if anything 🙂 Thanks for the love!